ON THIS PAGE
Progress0%


Our Global Presence :

According to leading blockchain research and data analytics platforms such as CryptoQuant, CryptoRank, and Nansen, monthly transactions on the TRON network wallet reached an all-time high of 323 million in December 2025. Furthermore, over 75% of Tether (USDT) transactions have been reported to occur on the TRON network, making it the dominant stablecoin settlement rail on the planet.
As a result, various startup founders, product managers, and curious developers have been trying to identify the tools and libraries to build their solutions on the TRON network, how to support TRC-20 tokens, and even how to ensure proper security.
Sounds familiar?
If you match that description, and you’re a developer or founder evaluating where and how to build, then you’re in luck. This guide walks you through TRON wallet development from first principles.
In this article, experts at Debut Infotech Pvt Ltd, a crypto development company, address the following:
This is your all-in-one starter guide for building the best TRON wallet, especially if you’re a beginner.
A TRON wallet is a tool that allows users to securely store, send, and receive TRX and other tokens, such as TRC-20 and TRC-721, on the TRON network wallet. Basically, that wallet lets users interact with the TRON blockchain.
Now, most beginners enter wallet development with the misconception that the TRON wallet “stores” their cryptocurrency tokens. But that couldn’t be further from the truth. The TRON wallet only controls accounts on the blockchain network through private keys that prove ownership of assets recorded there.
Every TRON wallet has three core components, namely:
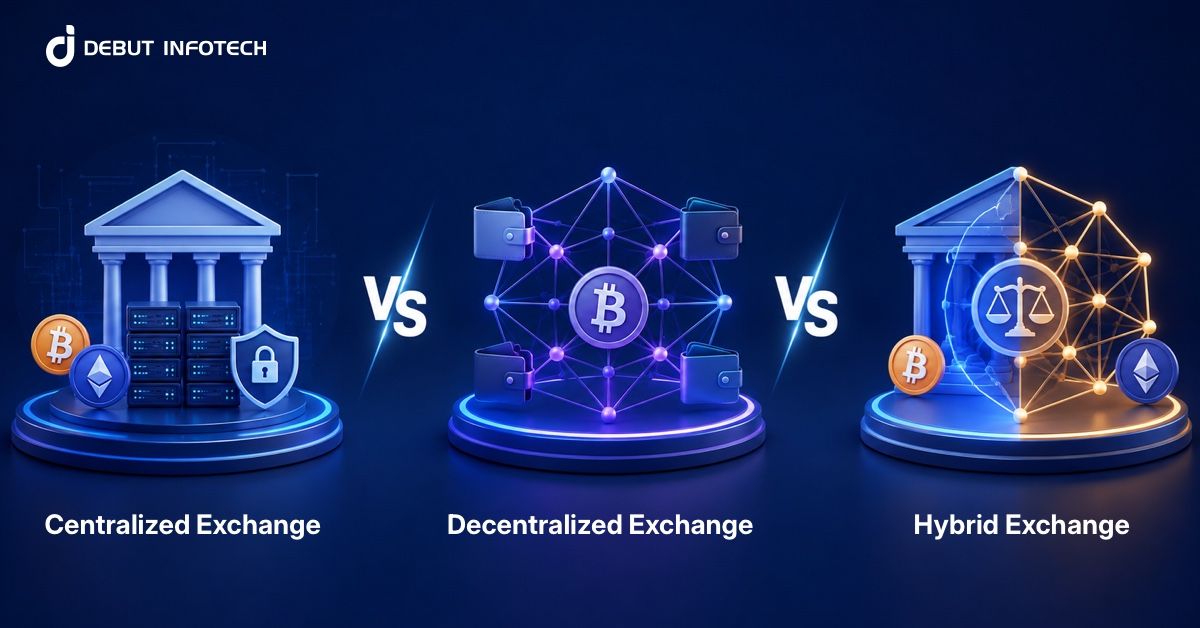
There are two major categories of TRON wallets, namely:
You also need to understand TRON’s two main token standards. TRC-10 tokens are built directly into the protocol layer and require no smart contract. TRC-20 tokens use smart contracts on the TRON Virtual Machine and mirror the ERC-20 standard on Ethereum — they are more flexible, more widely adopted, and the standard you will almost certainly need to support.
To start building the best TRON wallet, here are a couple things you need before you get started and why each piece matters.
TRONWeb is the primary JavaScript library for interacting with the TRON blockchain. It is to the TRON blockchain network what web3.js or ethers.js is to Ethereum. With this framework, you can handle wallet creation, transaction signing, contract interaction, and network communication.
Install it via npm: npm install tronweb.
is TRON’s API gateway service. It offers an easy-to-use hosted API, load-balanced full nodes, secure and reliable developer tools, and direct access to the TRON and BTTC network. You can enjoy these services by registering at trongrid.io for an API key. Your backend should use Node.js with Express.js for server-side logic, with TronWeb.js handling blockchain interaction.
This is where all development and testing happen before touching the mainnet. Get a free test TRX from the Shasta faucet at shasta.tronfaucet.io. Never build and test directly on mainnet — mistakes cost real money, and blockchain transactions cannot be reversed.
TronLink is TRON’s browser extension wallet, useful for manually testing interactions with your application during development. Think of it as the MetaMask equivalent for TRON.
This is TRON’s block explorer. Every transaction you send during development should be verified here — it is your primary debugging tool for confirming that what you sent is what arrived.
The following steps outline the steps to generate a TRON wallet.
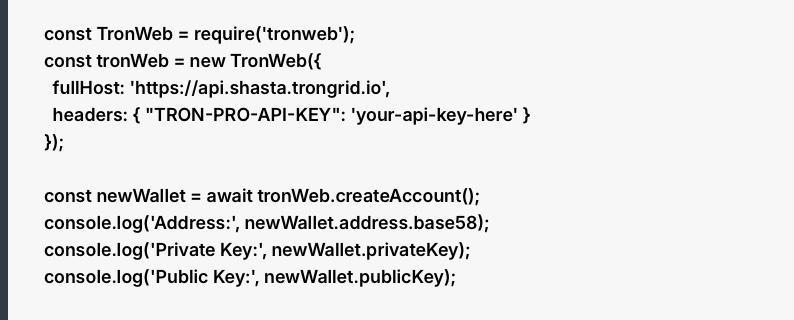
const TronWeb = require(‘tronweb’);
const tronWeb = new TronWeb({
fullHost: ‘https://api.shasta.trongrid.io’,
headers: { “TRON-PRO-API-KEY”: ‘your-api-key-here’ }
});
const newWallet = await tronWeb.createAccount();
console.log(‘Address:’, newWallet.address.base58);
console.log(‘Private Key:’, newWallet.privateKey);
console.log(‘Public Key:’, newWallet.publicKey);
The address.base58 output is the wallet’s public TRON address — the one you share. The privateKey output is what must never leave your secure environment. Verify the generated address on TRONSCAN to confirm it is valid and visible on the network.

const balance = await tronWeb.trx.getBalance(newWallet.address.base58);
console.log(‘Balance (in SUN):’, balance);
console.log(‘Balance (in TRX):’, tronWeb.fromSun(balance));
Note that TRON’s smallest unit is SUN, where 1 TRX equals 1,000,000 SUN. Always convert before displaying values to users.
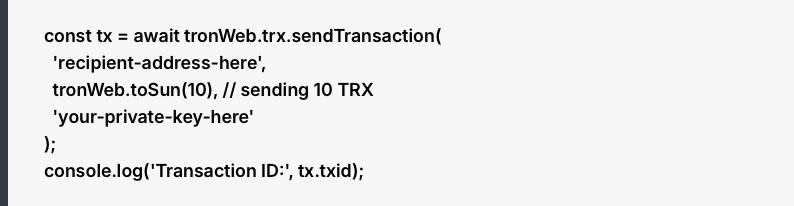
const tx = await tronWeb.trx.sendTransaction(
‘recipient-address-here’,
tronWeb.toSun(10), // sending 10 TRX
‘your-private-key-here’
);
console.log(‘Transaction ID:’, tx.txid);
Verify the transaction ID on TRONSCAN’s Shasta explorer immediately after sending. If it does not appear within 30 seconds, check your API key and network endpoint.

TRC-20 support is not optional if you are building a wallet for real users. USDT on TRON accounts for over 75% of all global stablecoin transfers — any wallet that cannot receive and send USDT TRC-20 is functionally incomplete for most use cases.
Querying a TRC-20 token balance requires interacting with the token’s smart contract:
const contractAddress = ‘TR7NHqjeKQxGTCi8q8ZY4pL8otSzgjLj6t’; // USDT on Shasta
const contract = await tronWeb.contract().at(contractAddress);
const balance = await contract.balanceOf(walletAddress).call();
console.log(‘USDT Balance:’, balance.toString());
Here is the concept that trips up more Ethereum developers than any other when moving to TRON: TRON replaces gas per transaction with bandwidth and energy. Users can stake TRX to obtain these resources or pay on demand. Bandwidth covers basic transaction size. Energy covers smart contract execution — every TRC-20 transfer consumes energy. Before sending a TRC-20 transaction, estimate the energy cost using tronWeb.transactionBuilder.estimateEnergy() and communicate resource requirements clearly to users in your UI. Failing to account for this is the most common reason TRC-20 transactions fail on TRON for developers coming from other chains.
Having worked with multiple developers over the years, our experts at Debut Infotech Pvt Ltd have identified some common pitfalls of developers building a TRON wallet app for the first time.
To avoid them, do the following:
This sounds obvious until you push code to a public GitHub repository at 2am and forget the .env file. Use environment variables for development, and never commit private keys to version control under any circumstances. Add .env to your .gitignore before your first commit, not after.
Environment variables are acceptable for development. In a production wallet handling real user funds, private keys must be stored in a Hardware Security Module (HSM) or a cloud-based Key Management Service such as AWS KMS or Google Cloud KMS. These services ensure private keys are never exposed in plaintext — not to your application, not to your team.
This often catches more beginners than any other single mistake. Storing a user’s 12 or 24-word seed phrase in plaintext in a database is equivalent to storing their private key in plaintext — anyone who accesses the database has complete access to the wallet. Seed phrases must be encrypted before storage, and the encryption key must be managed separately from the database. Ideally, seed phrases for non-custodial wallets never touch your server at all.
Multi-signature architecture adds a critical safety layer. TRON supports multi-sig natively at the protocol level, requiring multiple authorised parties to sign transactions above a defined threshold. This is standard practice for business wallets and treasury management — any developer building a commercial product should implement it from the outset.
Hardware wallet integration using Secure Element chips is the preferred option for high-security implementations. Software-based solutions require robust encryption at rest and in transit, with multi-factor authentication using email verification, SMS codes, or authenticator apps.
Before touching mainnet, your TRON wallet app should pass all of the following on Shasta:
Send TRX to another address and verify the transaction on TRONSCAN. Check that balances update correctly after both sending and receiving. Send a TRC-20 token transfer and confirm the smart contract interaction succeeds. Test what happens when a wallet has insufficient energy for a TRC-20 transfer — your UI should handle this gracefully, not crash. Attempt to send to an invalid address and confirm your validation logic catches it before broadcasting.
Some common testnet errors beginners encounter include the “Account not found,” which usually means you still need to activate TRON wallet address before proceeding. To do this, you need to receive at least 1 TRX before it becomes active on the network. “Out of energy” means insufficient resources for a smart contract call — add TRX to cover energy costs. Any “ERROR: No contract” message on Shasta likely means you are using a mainnet contract address on the testnet; the same contract will have a different address on each network.
The details we have provided in this guide would help a developer with solid JavaScript experience and some web3 familiarity build a functional TRON wallet on testnet in one to two weeks. However, a complete beginner starting from scratch might need four to six weeks to get to a testnet-ready build, and considerably longer to reach production quality.
In fact, when you start integrating complexities like multi-chain support, TRC-20 token management at scale, and KYC and AML compliance workflows, it becomes considerably more difficult, thereby lengthening the timeline.
What we’re trying to say is that, while it is relatively easier to build a personal or learning wallet by following this guide, you might need some specialist guidance if you’re trying to build a production-level wallet capable of handling real user funds at scale. That’s where you need the expertise of crypto wallet development services like Debut Infotech Pvt Ltd. This company has delivered production-grade wallet and token infrastructure across the TRON ecosystem and other major chains, working with startups and enterprise clients from initial architecture through to mainnet deployment.
Reach out today to get started!
Our Latest Insights
USA
2501 Chatham, Rd Suite R Springfield, IL 62704
+1-708-515-4004
info@debutinfotech.com
UK
7 Pound Close, Yarnton, Oxfordshire, OX51QG
+44-770-304-0079
info@debutinfotech.com
Canada
326 Parkvale Drive, Kitchener, ON N2R1Y7
+1-708-515-4004
info@debutinfotech.com
INDIA
Sector 101-A, Plot No: I-42, IT City Rd, JLPL Industrial Area, Mohali, PB 140306
9888402396
info@debutinfotech.com
Copyright © 2026, Debut Infotech. All rights reserved. | Privacy Policy